When it comes to virtual environment, vSphere networking is one of the most critical component. In this series on vSphere Networking we will discuss about basics of vSphere standard switches and vSphere distributed switches.
When we talk about the vSphere Virtual Networking, there are two types of VMware virtual switches -
1. vSphere Standard Switch (VSS)
2. vSphere Distributed Switch (VDS)
Virtual switches enables virtual machines to talk to each other as well as communicate with the physical network. Both types of switches allows administrator to configure and manage virtual machine traffic.
Let's discuss more about it.
What is vSphere Standard Switch?

(Image Courtesy - VMware)
The default virtual switch that gets created when we install ESXi server is the vSphere Standard Switch. Above diagram shows architecture of Standard switch. A vSphere Standard Switch is very similar to a physical Ethernet switch.
Standard switch is used to provide the network connectivity to ESXi host and virtual machines. When we install ESXi host, the default management port group gets created on the standard switch vSwitch 0. Physical Network adapters on the server are connected to the uplink ports of this Standard Switch. Then VM's which are running on the ESXi hosts uses virtual network adapters(vNIC) to connect to the port groups on the standard switch.
We can create multiple port groups on a Standard Switch. A port group defines how a connection is made through the switch to the external network. A port group is identified by a unique network label. We can not have two port groups with a same name on a ESXi host.
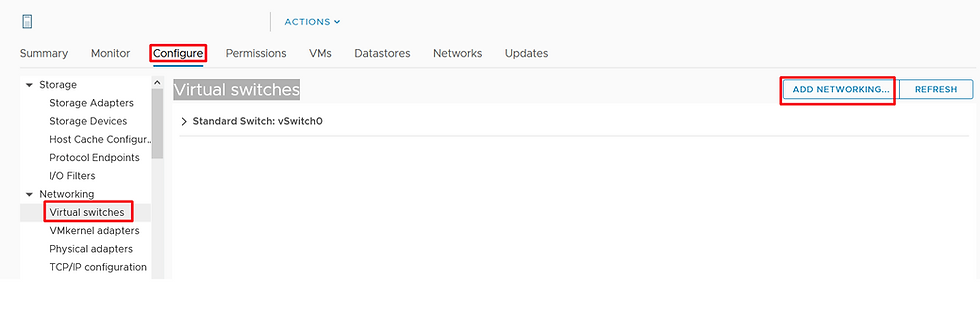
Create and configure vSphere Standard Switch
To create the vSphere Standard Switch on the ESXi host, navigate to the
ESXi host > Configure > Networking > Virtual Switches > Click Add Networking
Select a connection type for which you want to use the new standard switch

VMkernel Network Adapter - Create a new VMkernel adapter to handle host management trafficǰ,vMotion, network storage, fault tolerance, or Virtual SAN traffic
Virtual Machine Port Group for a Standard Switch - Create a new port group for virtual machine networking
Physical Network Adapter - Add physical network adapters to an existing or a new standard switch.
Depending on which type of VSS we want to create, we can select the appropriate option here to either Select an existing standard switch or New standard switch.

In this case I'll show to how to create new vmkernel port group on new vSwitch.
To add physical network adapters to the new standard switch, click on Add Adapters.
Select one or more physical network adapters from the list.

Now label the new port group which indicates the traffic type for the VMkernel adapter, for example VMkernel.

Configure the IP as per the requirement

Review the settings and click on Finish.

Now that we have learned to create Standard Switch, lets take a look at the vSwitch Settings.
Navigate to ESXi host > Configure > Networking > Virtual Switches
Select the standard switch and click on EDIT

In the first tab, we can enable MTU settings on the vSwitch. We can also enable Jumbo frame here.

In the Security tab, we can see the three elements of Security policy i.e. Promiscuous mode, MAC Address changes, Forged transmits.

Promiscuous mode
Reject - The VM network adapter receives only frames that are addressed to the virtual machine.
Accept - If an adapter is placed in promiscuous mode from the guest operating system, the switch allows the guest adapter to receive all frames passed on the switch in compliance with the active VLAN policy for the port where the adapter is connected.
Firewalls, port scanners, intrusion detection systems and so on, need to run in promiscuous mode.
MAC address changes
Reject - If you set this option to Reject and the guest operating system changes the MAC address of the adapter to a value different from the address in the .vmx configuration file, the switch drops all inbound frames to the virtual machine adapter. If the guest operating system changes the MAC address back, the
virtual machine receives frames again.
Accept - If the guest operating system changes the MAC address of a network adapter, the adapter receives frames to its new address.
Forged transmits
Reject - The switch drops any outbound frame with a source MAC address that is different from the one in the .vmx configuration file.
Accept - The switch does not perform filtering and permits all outbound frames.
In the next tab, we can define Traffic Shaping Policies. A traffic shaping policy is defined by average bandwidth, peak bandwidth, and burst size.

Average Bandwidth
Establishes the number of bits per second to allow across a port, averaged over time. This number is the allowed average load.
Peak Bandwidth
Maximum number of bits per second to allow across a port when it is sending or receiving a burst of traffic. This number limits the bandwidth that a port uses when it is using its burst bonus.
Burst Size Maximum
number of bytes to allow in a burst. If this parameter is set, a port might gain a burst bonus if it does not use all its allocated bandwidth. When the port needs more bandwidth than specified by the average bandwidth, it might be allowed to temporarily transmit data at a higher speed if a burst bonus is available. This parameter limits the number of bytes that have accumulated in the burst bonus and transfers traffic at a higher speed.
The last tab - Teaming and failover settings provide control over load balancing configuration, network failure detection, failback, and the failover order of the network cards

Load Balancing
IP-based teaming requires that the physical switch be configured with ether channel. For all other options, ether channel should be disabled. Select how to choose an uplink.
Route based on the originating virtual port - Choose an uplink based on the virtual port where the traffic entered the distributed switch.
Route based on IP hash - Choose an uplink based on a hash of the source and destination IP addresses of each packet. For non-IP packets, whatever is at those offsets is used to compute the hash.
Route based on source MAC hash - Choose an uplink based on a hash of the source Ethernet.
Route based on physical NIC load - Choose an uplink based on the current loads of physical NICs.
Use explicit failover order - Always use the highest order uplink, from the list of Active adapters, which passes failover detection criteria.
Network Failure Detection
Link status only - Relies solely on the link status that the network adapter provides. This option detects failures, such as cable pulls and physical switch power failures, but not configuration errors, such as a physical switch port being blocked by spanning tree or that is misconfigured to the wrong VLAN or cable pulls on the other side of a physical switch.
Beacon probing - Sends out and listens for beacon probes on all NICs in the team and uses this information, in addition to link status, to determine link failure. Do not use beacon probing with IP-hash load balancing
Notify switches
Select Yes or No to notify switches in the case of failover. Do not use this option when the virtual machines using the port group are using Microsoft Network Load Balancing in unicast mode. If you select Yes, whenever a virtual NIC is connected to the distributed switch or whenever that virtual NIC’s traffic is routed over a different physical NIC in the team because of a failover event, a notification is sent out over the network to update the lookup tables on physical switches. Use this process for the lowest latency of failover occurrences and migrations with vMotion.
Failback
Select Yes or No to disable or enable failback. This option determines how a physical adapter is returned to active duty after recovering from a failure. n Yes (default). The adapter is returned to active duty immediately upon recovery, displacing the standby adapter that took over its slot, if any. n No. A failed adapter is left inactive even after recovery until another currently active adapter fails, requiring its replacement.
Failover order
Select how to distribute the work load for uplinks. To use some uplinks but reserve others in case the uplinks in use fail, set this condition by moving them into different groups.
Active uplinks - Continue to use the uplink when the network adapter connectivity is up and active.
Standby uplinks - Use this uplink if one of the active adapter’s connectivity is down. When using IP-hash load balancing, do not configure standby uplinks.
Unused uplinks - Do not use this uplink.
With this, let's conclude the first part of this series on vSphere Networking.
For more information refer to the vSphere Networking guide from VMware which is specifically for vSphere 6.5.
In the next post, lets discuss about Distributed Switches, a useful feature when managing multiple hosts via vCenter Server.
I hope people who are new to ESXi find this article useful.
*** Explore | Share | Grow ***
Comments